Follow Me On Social Media!

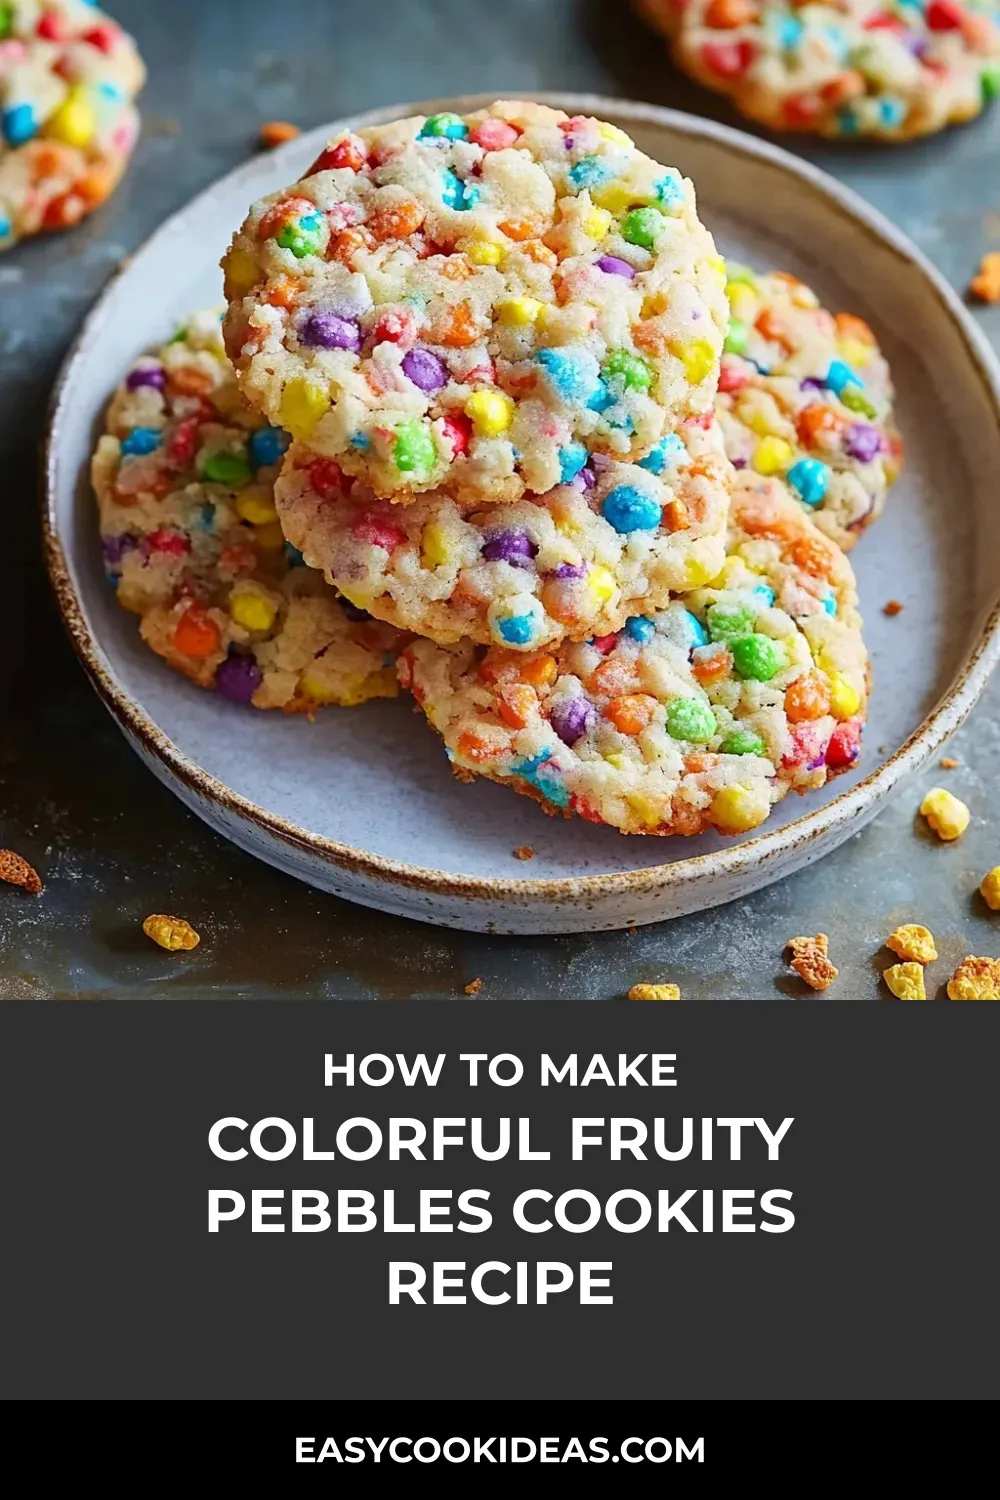
Welcome to a world where childhood nostalgia meets gourmet cookie magic with our delightful recipe for Fruity Pebbles Cookies! These whimsical treats take the beloved breakfast cereal to new heights, infusing it into a classic sugar cookie base for a burst of color and crunch in every bite. Imagine a buttery, tender cookie dough speckled with vibrant Fruity Pebbles both inside and out, creating a visual feast that’s as fun to look at as it is to eat.
I remember the first time I whipped up a batch of these Fruity Pebbles Cookies for my nephew’s birthday bash, instantly becoming the star of the dessert table. The reaction from guests was pure joy and nostalgia, as they reminisced about Saturday mornings and childhood cereal adventures. Since then, these cookies have earned a special place in my recipe collection, becoming a sought-after treat that never fails to put a smile on everyone’s face.
Whether you’re planning a themed party, a cozy gathering, or simply craving a whimsical twist on a classic cookie, these Fruity Pebbles Cookies are sure to steal the spotlight. With their playful colors, delightful texture, and irresistible flavor, they’re perfect for bringing a touch of magic to any occasion. So, grab your baking essentials and get ready to embark on a colorful culinary journey that’s as delightful to bake as it is to eat!
Quick Benefits
- Visual Appeal: The vibrant colors of Fruity Pebbles cereal make these cookies visually striking and perfect for themed parties or social media-worthy desserts.
- Textural Contrast: Enjoy a delightful blend of tender cookie and crispy cereal in every bite, providing a unique and satisfying mouthfeel.
- Nostalgic Flavors: These cookies evoke childhood memories of Saturday morning cartoons and cereal, offering a sweet and playful treat for guests of all ages.
- Versatile Variations: From chocolate versions to holiday twists, the recipe offers endless possibilities for customization, making it suitable for different occasions and preferences.
Why You’ll Love This Colorful Fruity Pebbles Cookies Recipe Recipe
- This recipe offers a unique twist on traditional sugar cookies by incorporating colorful Fruity Pebbles cereal, making it a fun and eye-catching treat that will impress both kids and adults alike.
- The combination of the buttery sugar cookie base and the crispy, fruity cereal provides a delightful textural experience that is both familiar and exciting, ensuring each bite is a delicious surprise.
- These cookies evoke feelings of nostalgia and childhood memories, making them perfect for themed parties or gatherings where you want to spark conversations and create a sense of joy.
- The versatility of this recipe allows for various adaptations, such as creating ice cream sandwiches, experimenting with different cereal flavors, or adding seasonal twists, making it a go-to recipe for any occasion.
- The straightforward technique and simple ingredients make this recipe accessible to bakers of all skill levels, ensuring that you can easily whip up a batch of these delightful cookies to share with friends and family.
- Storing and freezing tips provided in the recipe allow you to prepare these cookies in advance or keep them fresh for longer periods, giving you the flexibility to enjoy these treats whenever you crave a taste of childhood whimsy.
Ingredients for Colorful Fruity Pebbles Cookies Recipe
Cookie Dough Ingredients
- 1 cup (8 oz.) salted butter, at room temperature
- 1/2 tsp. baking soda
- 1 cup Fruity Pebbles cereal, for the dough
- 2 large eggs, at room temperature
- 1 1/2 cups granulated sugar
- 3 cups (about 13 oz.) all-purpose flour
- 1 tsp. vanilla extract
For Coating
- 3/4 cup Fruity Pebbles cereal, for rolling
Pro Tips for Colorful Fruity Pebbles Cookies Recipe
For the Fruity Pebbles Cookies, a pro tip is to ensure that the butter and eggs are at room temperature before starting. This will help create a smooth dough and ensure even mixing of ingredients. Additionally, when adding the Fruity Pebbles cereal to the dough, gently fold it in to avoid crushing the colorful cereal pieces, maintaining their vibrant appearance in the baked cookies.
To enhance the flavor and texture contrast of these cookies, another pro tip is to refrigerate the dough for at least 30 minutes before baking. Chilling the dough will help prevent excessive spreading in the oven, resulting in thicker and chewier cookies with a delightful crunch from the Fruity Pebbles coating. Remember to roll the chilled dough balls generously in Fruity Pebbles cereal before baking for that extra pop of color and texture on the exterior of the cookies.
How to Make Colorful Fruity Pebbles Cookies Recipe
Step 1: Prep Your Space
Preheat the oven to 325°F with racks in the upper and lower thirds. Line three baking sheets with parchment paper to prevent sticking and ease cleanup.
Step 2: Create Your Cookie Base
In a large bowl, combine room temperature butter and sugar. Beat together until light and fluffy, approximately 3 minutes using an electric mixer on medium speed. Aim for a whipped cream-like consistency to create air pockets for tender cookies.
Step 3: Add the Wet Ingredients
Add eggs one at a time, beating for about 10 seconds after each addition. Scrape down the sides of the bowl. Beat in vanilla and baking soda for about 15 seconds until fully incorporated.
Step 4: Mix in the Flour
Gradually mix in the flour until just combined, taking about 30 seconds. Avoid overmixing. Stop when no dry flour is visible. Fold in 1 cup of Fruity Pebbles using a spatula until evenly distributed in the dough.
Step 5: Form and Coat Your Cookies
Use a 2-tablespoon cookie scoop or a spoon to shape the dough into balls, making around 30 in total. Roll each ball in 3/4 cup of Fruity Pebbles to coat. Place them on baking sheets, spaced one inch apart, and lightly press down with fingertips.
Step 6: Bake in Batches
Place two cookie sheets in the preheated oven, one on the upper rack and one on the lower rack. Bake for 13-15 minutes, swapping the positions halfway through for even baking. Cookies are done when the sides are set and the bottoms are light golden brown. The centers may still look slightly soft, which is desired.
Step 7: Cool and Repeat
After baking, allow the cookies to cool on the baking sheets for 5 minutes to firm up. Transfer them to a wire rack using a spatula. Bake the third sheet of cookies on the upper rack, following the same timing. Allow them to cool in the same manner.
Step 8: Enjoy Your Colorful Creation
Enjoy the cookies warm or let them cool for 15 minutes for a perfect balance of crisp edges and chewy centers. Top with colorful cereal pieces for bursts of fruity flavor.
📌 Pin for later!
Storage Tips
Once you have baked the Fruity Pebbles cookies, it is important to store them properly to maintain their freshness and texture. Store the cookies in an airtight container at room temperature for up to 5 days. This will help preserve their flavor and prevent them from becoming stale. If you find that the cookies have hardened over time, you can place a slice of bread in the container overnight to help soften them up.
If you want to save some cookies for later enjoyment, you can freeze unbaked dough balls for up to 3 months. Before baking, roll the dough balls in Fruity Pebbles cereal to add that signature crunch and vibrant appearance. This way, you can have freshly baked Fruity Pebbles cookies whenever you crave them. By following these storage tips, you can ensure that your Fruity Pebbles cookies stay delicious and delightful for an extended period.
Ingredient Substitutions
If you need to make substitutions for this Fruity Pebbles Cookies recipe, there are a few options available. For a dairy-free version, you can replace the salted butter with a plant-based butter substitute or margarine. Make sure it’s suitable for baking to maintain the cookie’s texture and flavor.
If you’re looking to make these cookies gluten-free, you can swap the all-purpose flour with a gluten-free flour blend. Be mindful of the texture of the dough, as gluten-free flours may require slightly different handling. Additionally, if you don’t have Fruity Pebbles cereal on hand, you can experiment with other colorful and flavorful cereals like Trix or Fruit Loops to achieve a similar visual and taste experience in the cookies.
Remember to consider any dietary restrictions or preferences when making ingredient substitutions to ensure the final result aligns with your needs and tastes. Feel free to get creative with different ingredient swaps to customize the cookies to your liking while maintaining the essence of the original recipe’s playful and nostalgic appeal.
Serving Suggestions
Serve these whimsical Fruity Pebbles cookies alongside a DIY ice cream sandwich station at your next gathering. Guests can create their own unique combinations by sandwiching creamy vanilla ice cream between two cookies, making for a fun and interactive dessert experience that everyone will enjoy.
For a playful and vibrant dessert spread, feature these Fruity Pebbles cookies as part of a cereal-themed display. Pair them with other childhood favorites like Rice Krispies treats, Lucky Charms marshmallow bars, and Cocoa Pebbles brownies to create a nostalgic and visually appealing array that will delight guests of all ages. This colorful and nostalgic spread is perfect for birthday parties, baby showers, or any gathering where you want to evoke a sense of fun and whimsy.
FAQs for Colorful Fruity Pebbles Cookies Recipe
Can I use unsalted butter instead of salted butter in this recipe?
Yes, you can use unsalted butter in place of salted butter. Just make sure to add a pinch of salt to the dough to make up for the salt that would have been in the salted butter.
Can I substitute the Fruity Pebbles cereal with a different cereal?
While Fruity Pebbles cereal is recommended for its vibrant colors and fruity flavor, you can experiment with other cereals. Just keep in mind that the flavor and appearance of the cookies will be different based on the cereal you choose.
How can I prevent the Fruity Pebbles from becoming soggy in the dough?
To prevent the Fruity Pebbles from becoming soggy in the dough, you can try gently folding them into the dough at the last minute before baking. This helps preserve their crunchiness in the finished cookies.
Can I make these cookies ahead of time for an event?
Yes, you can make these cookies ahead of time. Store them in an airtight container at room temperature for up to 5 days. You can also freeze unbaked dough balls for up to 3 months and roll them in cereal before baking.
Conclusion
As you embark on creating your own batch of Fruity Pebbles Cookies, remember that these treats are more than just a delightful dessert – they are a celebration of the joy and nostalgia that food can bring. Whether you’re baking them for a special occasion, a family gathering, or simply to brighten someone’s day, these cookies are sure to leave a lasting impression.
So gather your ingredients, turn on the oven, and let the aroma of buttery sugar cookies and fruity cereal fill your kitchen. Embrace the playful spirit of these Fruity Pebbles Cookies and share the love with those around you. With their colorful appearance and delightful taste, these cookies are bound to become a favorite in your repertoire. Enjoy the process of baking and savor the sweet rewards of your labor as you bite into a cookie that captures the essence of childhood in every crumb. Happy baking, and may your Fruity Pebbles Cookies bring a smile to all who indulge in their whimsical charm!
📌 Pin for later!
Colorful Fruity Pebbles Cookies Recipe
“Colorful Fruity Pebbles cookies blend childhood nostalgia with sophisticated flavors for a vibrant treat loved by all ages.”
Prep Time20 Minutes
Cook Time15 Minutes
Total Time35 Minutes
CuisineAmerican
Skill LevelEasy
Servings30 Servings (30 cookies)
Ingredients
Cookie Dough Ingredients
- 1 cup (8 oz.) salted butter, at room temperature
- 1/2 tsp. baking soda
- 1 cup Fruity Pebbles cereal, for the dough
- 2 large eggs, at room temperature
- 1 1/2 cups granulated sugar
- 3 cups (about 13 oz.) all-purpose flour
- 1 tsp. vanilla extract
For Coating
- 3/4 cup Fruity Pebbles cereal, for rolling
Instructions
-
Prep Your Space: Preheat the oven to 325°F with racks in the upper and lower thirds. Line three baking sheets with parchment paper to prevent sticking and ease cleanup.
-
Create Your Cookie Base: In a large bowl, combine room temperature butter and sugar. Beat together until light and fluffy, approximately 3 minutes using an electric mixer on medium speed. Aim for a whipped cream-like consistency to create air pockets for tender cookies.
-
Add the Wet Ingredients: Add eggs one at a time, beating for about 10 seconds after each addition. Scrape down the sides of the bowl. Beat in vanilla and baking soda for about 15 seconds until fully incorporated.
-
Mix in the Flour: Gradually mix in the flour until just combined, taking about 30 seconds. Avoid overmixing. Stop when no dry flour is visible. Fold in 1 cup of Fruity Pebbles using a spatula until evenly distributed in the dough.
-
Form and Coat Your Cookies: Use a 2-tablespoon cookie scoop or a spoon to shape the dough into balls, making around 30 in total. Roll each ball in 3/4 cup of Fruity Pebbles to coat. Place them on baking sheets, spaced one inch apart, and lightly press down with fingertips.
-
Bake in Batches: Place two cookie sheets in the preheated oven, one on the upper rack and one on the lower rack. Bake for 13-15 minutes, swapping the positions halfway through for even baking. Cookies are done when the sides are set and the bottoms are light golden brown. The centers may still look slightly soft, which is desired.
-
Cool and Repeat: After baking, allow the cookies to cool on the baking sheets for 5 minutes to firm up. Transfer them to a wire rack using a spatula. Bake the third sheet of cookies on the upper rack, following the same timing. Allow them to cool in the same manner.
-
Enjoy Your Colorful Creation: Enjoy the cookies warm or let them cool for 15 minutes for a perfect balance of crisp edges and chewy centers. Top with colorful cereal pieces for bursts of fruity flavor.