Follow Me On Social Media!
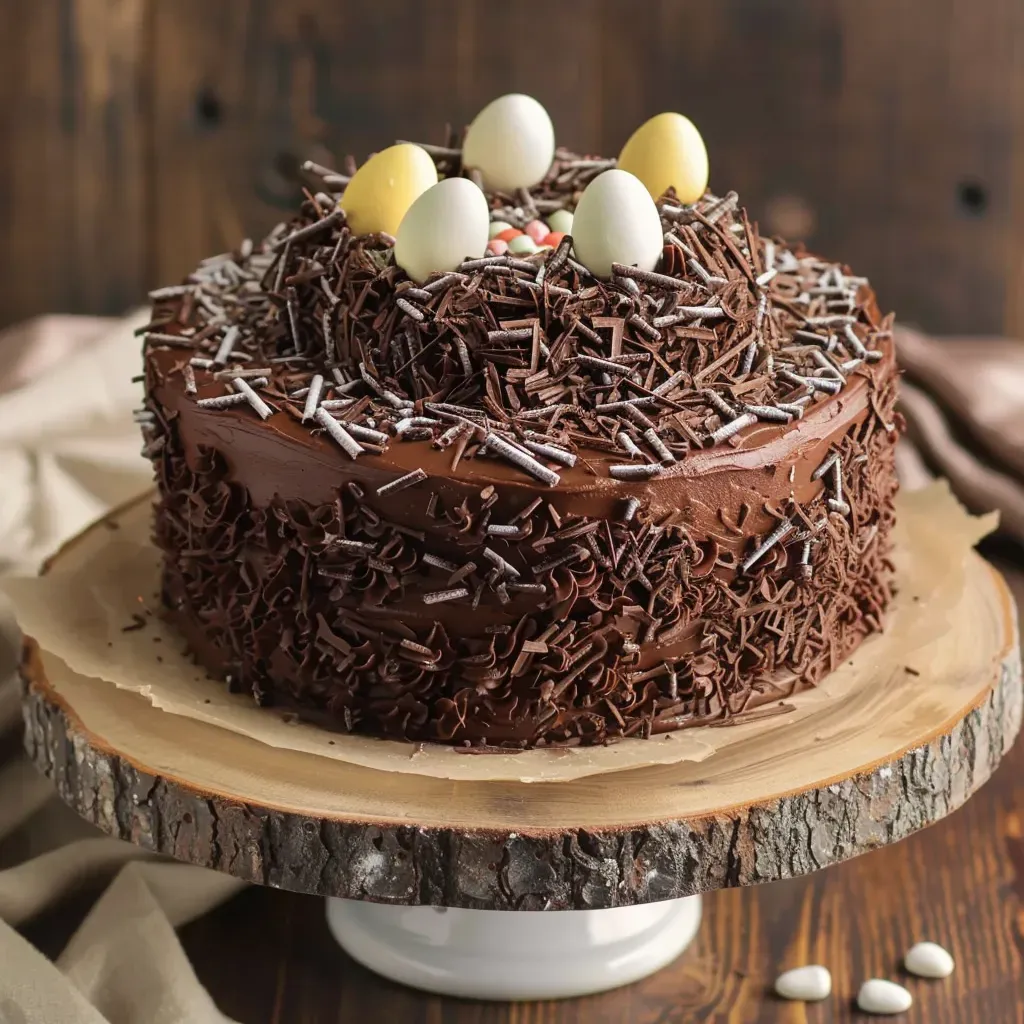
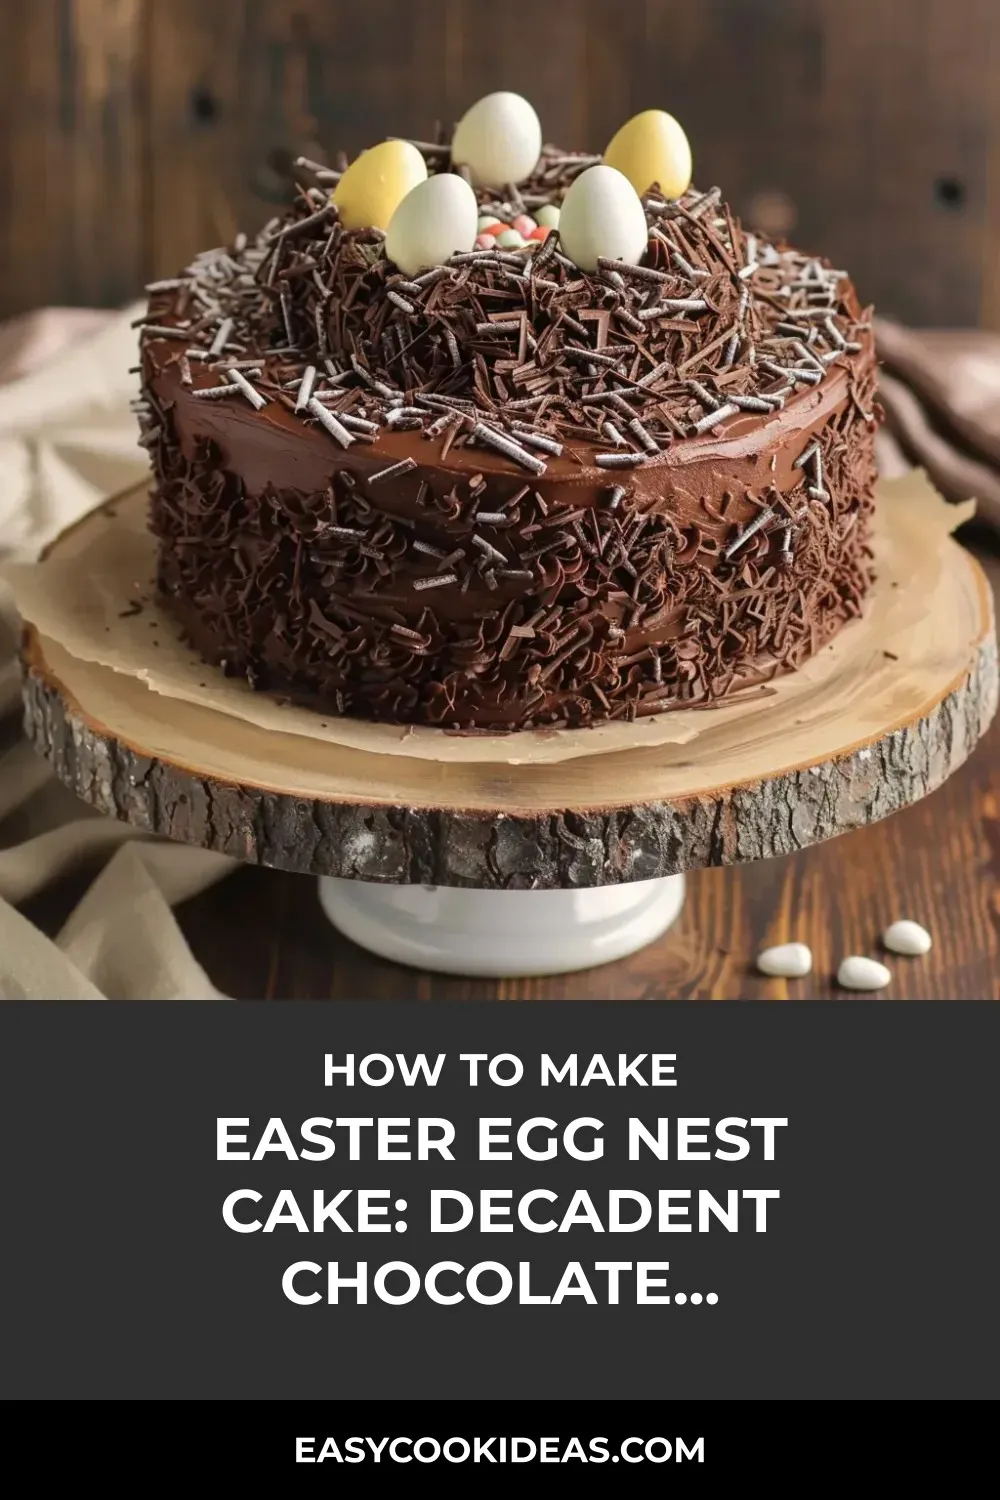
Get ready to dazzle your guests with the ultimate Easter dessert – the Chocolate Easter Egg Nest Cake! Picture this: layers of rich chocolate cake topped with a delicate chocolate nest cradling colorful mini eggs, creating a showstopping centerpiece for your holiday table. The perfect balance of sophistication and whimsy, this cake encapsulates the joy and renewal of the season in every bite.
Last Easter, I witnessed firsthand the magic of this Chocolate Easter Egg Nest Cake at our family gathering. From my father-in-law’s declaration of it being the best chocolate cake ever to my nephew’s fascination with the “cool chocolate twigs” of the nest, this dessert captured hearts of all ages. It’s more than just a cake – it’s a symbol of togetherness and celebration, creating cherished memories one slice at a time.
Crafted with love and a touch of seasonal magic, this cake is a true labor of love that pays off in smiles and compliments. The coffee-infused batter keeps the cake moist and flavorful, while the artful decoration with mini eggs adds a festive touch. So, whether you’re a seasoned baker or a first-time dessert maker, embrace the spirit of Easter with this Chocolate Easter Egg Nest Cake and let the joy of the season unfold at your table.
Quick Benefits
- Showstopping Presentation: Impress guests with a sophisticated yet whimsical dessert featuring rich chocolate layers and a delicate chocolate nest, crowned with colorful mini eggs.
- Deep, Moist Flavor: The use of hot coffee in the batter enhances the cocoa powder’s flavor profile, resulting in a moist and decadent cake that will leave everyone wanting more.
- Memorable Experience: Creating and serving this cake can become a cherished tradition, connecting generations through shared experiences and creating lasting memories during holiday gatherings.
Why You’ll Love This Easter Egg Nest Cake: Decadent Chocolate Delight Recipe
- Perfect for Easter celebrations: This cake will elevate your holiday gathering, becoming the centerpiece that captures the joy and renewal of the season.
- Delightfully whimsical: The chocolate nest with colorful mini eggs on top adds a playful touch that appeals to both kids and adults.
- Rich and moist chocolate layers: The combination of buttermilk, hot coffee, and high-quality cocoa powder creates a decadent and moist cake that is sure to impress.
- A showstopper dessert: Impress your guests with a sophisticated yet approachable dessert that will have faces lighting up with delight.
- Creates lasting memories: Whether decorating with loved ones or savoring each bite, this cake fosters moments of connection and joy that become cherished memories.
- Achievable and impressive: Suitable for both experienced bakers and beginners, this recipe strikes the perfect balance between achievable technique and stunning results, making it a must-try for any Easter celebration.
Ingredients for Easter Egg Nest Cake: Decadent Chocolate Delight
For the Chocolate Cake
- 1 cup (240ml) hot water or coffee
- 1 ¾ cups (220g) all-purpose flour
- ½ cup (120ml) vegetable oil
- 2 teaspoons vanilla extract
- ½ teaspoon salt
- 2 large eggs
- 1 teaspoon baking soda
- 1 cup (240ml) buttermilk
- 2 teaspoons baking powder
- ¾ cup (75g) unsweetened cocoa powder
- 2 cups (400g) granulated sugar
For the Chocolate Ganache
- 1 cup (240ml) heavy cream
- 1 tablespoon unsalted butter
- 8 oz (225g) dark chocolate, chopped
For the Chocolate Nest
- Mini chocolate eggs or candy-coated Easter eggs for decoration
- 6 oz (170g) dark chocolate, melted
Pro Tips for Easter Egg Nest Cake: Decadent Chocolate Delight
Pro Tip 1: To enhance the flavor and moistness of the cake, use hot coffee instead of water in the batter. The coffee will bring out the richness of the cocoa powder, creating a more decadent chocolate cake.
Pro Tip 2: When making the chocolate nest, work quickly to shape the melted dark chocolate into thin twigs on parchment paper. This will give your nest a delicate and realistic appearance, adding to the whimsical charm of the cake.
Pro Tip 3: Have fun with decorating the cake! Let your creativity shine by arranging the mini chocolate eggs or candy-coated Easter eggs in the nest in a visually appealing way. This cake is not only delicious but also a stunning centerpiece for your Easter celebration.
How to Make Easter Egg Nest Cake: Decadent Chocolate Delight
Step 1: Prepare the chocolate cake
1. Preheat the oven to 350°F (175°C) and prepare a 9-inch round cake pan with parchment paper. In a large bowl, combine flour, cocoa powder, sugar, baking powder, baking soda, and salt. Mix in buttermilk, vegetable oil, eggs, and vanilla extract until well combined. Gradually add hot water or coffee and mix until smooth.
Step 2: Bake the cake
Transfer the batter to the prepared pan and bake for 30-35 minutes until a toothpick inserted in the center comes out clean. Cool the cake in the pan for 10 minutes, then transfer to a wire rack to cool completely before decorating.
Step 3: Make the ganache
In a saucepan, heat the heavy cream until it simmers. Remove from heat and pour over chopped dark chocolate. Let sit for 2-3 minutes, then stir until smooth. Add butter and stir until fully mixed. Cool ganache until slightly thickened but still pourable.
Step 4: Create the chocolate nest
1. Microwave dark chocolate in 30-second intervals, stirring until smooth. Transfer to a piping bag. Pipe crisscrossing strands on parchment paper-lined tray to form a circular nest. Chill in the refrigerator for 15-20 minutes until firm.
Step 5: Assemble the cake
Transfer the cooled cake to a serving platter. Drizzle chocolate ganache over the cake, allowing it to cascade down the sides. Gently remove the chocolate nest from the parchment paper and position it on the cake. Fill the nest with mini chocolate eggs before serving.
📌 Pin for later!
Storage Tips
Once you have crafted your Chocolate Easter Egg Nest Cake to perfection, storing it properly is essential to maintain its freshness and presentation. To store the finished cake, it is best kept in an airtight container or tightly wrapped in plastic wrap at room temperature. This will help preserve the moisture and texture of the cake for up to 2-3 days.
For longer storage, you can refrigerate the Chocolate Easter Egg Nest Cake. Place it in an airtight container or cover it with plastic wrap to prevent it from drying out in the fridge. When properly stored in the refrigerator, the cake can stay fresh for up to 5-7 days. Just be sure to bring it back to room temperature before serving to enjoy its full flavor and texture.
Remember, the Chocolate Easter Egg Nest Cake is best enjoyed fresh, so try to consume it within a few days of baking for the most delightful taste and appearance. Whether for a festive gathering or a special treat at home, storing the cake correctly will help maintain its quality and ensure a delightful experience for all who indulge in this delicious dessert.
Ingredient Substitutions
For ingredient substitutions, if you don’t have buttermilk on hand, you can easily make a DIY version by adding 1 tablespoon of vinegar or lemon juice to 1 cup of milk and letting it sit for 5-10 minutes until it curdles slightly. This can be used as a substitute for buttermilk in the recipe. Additionally, if you prefer to use a different type of oil instead of vegetable oil, you can substitute it with melted coconut oil, canola oil, or even melted butter in equal quantities.
If you’re looking to make the cake a bit lighter, you can swap the heavy cream in the chocolate ganache with full-fat coconut milk for a dairy-free alternative. The coconut milk will provide a creamy texture to the ganache while adding a subtle coconut flavor that complements the chocolate well. And for the chocolate decorations, if you don’t have dark chocolate on hand, you can use milk chocolate or a combination of both for a sweeter taste profile. Just ensure the chocolate is of good quality for the best results in the decoration of the nest and overall presentation of the cake.
Serving Suggestions
For a stunning presentation, serve the Chocolate Easter Egg Nest Cake on a decorated cake stand with a sprinkling of edible flowers around the base. Add a few fresh sprigs of mint to enhance the vibrant colors of the mini chocolate eggs, creating a picturesque springtime scene that will capture everyone’s attention before they even take a bite.
To elevate the dessert experience further, consider serving each slice of the Chocolate Easter Egg Nest Cake with a dollop of lightly sweetened whipped cream or a scoop of vanilla bean ice cream. The contrast of the cold, creamy accompaniment against the rich, moist cake and decadent chocolate nest will provide a delightful textural and temperature contrast that will have your guests raving about this dessert long after Easter has passed.
FAQs for Easter Egg Nest Cake: Decadent Chocolate Delight
Can I use milk instead of buttermilk in this recipe?
Yes, you can substitute buttermilk with an equal amount of milk for this recipe. However, buttermilk adds a slight tanginess and helps create a tender crumb, so the texture and flavor may vary slightly.
Can I use milk chocolate instead of dark chocolate for the ganache and decorations?
Yes, you can use milk chocolate instead of dark chocolate for a sweeter flavor profile. Keep in mind that milk chocolate is softer when melted, so the ganache may have a slightly different consistency compared to using dark chocolate.
How should I store the Chocolate Easter Egg Nest Cake?
It’s best to store the cake in the refrigerator due to the ganache and cream components. Make sure to cover it loosely with plastic wrap or place it in an airtight container to prevent the cake from absorbing other odors in the fridge.
Can I make this cake in advance and freeze it?
Yes, you can make the cake layers in advance, wrap them tightly in plastic wrap, and freeze them for up to a month. Thaw the layers in the refrigerator before assembling the cake. It’s best to add the chocolate nest and decorations after thawing to maintain their appearance and texture.
Conclusion
As you embark on creating your own Chocolate Easter Egg Nest Cake, remember that baking is not just about following a recipe but about infusing your creation with love and joy. This cake has the power to bring smiles, evoke memories, and create moments of connection with your loved ones. Embrace the process, savor each step, and most importantly, have fun with it!
So, go ahead and let your creativity soar as you craft your very own Chocolate Easter Egg Nest Cake. Whether you’re making it for a festive gathering or simply to indulge in some holiday cheer, this dessert is sure to be a delightful addition to your Easter celebrations. Share the joy of this delicious treat with your family and friends, and watch as it becomes a cherished part of your holiday traditions. Happy baking, and may your Chocolate Easter Egg Nest Cake bring warmth and sweetness to your Easter festivities!
📌 Pin for later!
Easter Egg Nest Cake: Decadent Chocolate Delight
Indulge in the whimsical and sophisticated charm of a Chocolate Easter Egg Nest Cake – a rich chocolate masterpiece crowned with a delicate nest and colorful candies.
Prep Time30 Minutes
Cook Time35 Minutes
Total Time65 Minutes
CuisineEuropean
Skill LevelEasy
Servings12 Servings (One 9-inch cake)
Ingredients
For the Chocolate Cake
- 1 cup (240ml) hot water or coffee
- 1 ¾ cups (220g) all-purpose flour
- ½ cup (120ml) vegetable oil
- 2 teaspoons vanilla extract
- ½ teaspoon salt
- 2 large eggs
- 1 teaspoon baking soda
- 1 cup (240ml) buttermilk
- 2 teaspoons baking powder
- ¾ cup (75g) unsweetened cocoa powder
- 2 cups (400g) granulated sugar
For the Chocolate Ganache
- 1 cup (240ml) heavy cream
- 1 tablespoon unsalted butter
- 8 oz (225g) dark chocolate, chopped
For the Chocolate Nest
- Mini chocolate eggs or candy-coated Easter eggs for decoration
- 6 oz (170g) dark chocolate, melted
Instructions
-
Prepare the chocolate cake: 1. Preheat the oven to 350°F (175°C) and prepare a 9-inch round cake pan with parchment paper. In a large bowl, combine flour, cocoa powder, sugar, baking powder, baking soda, and salt. Mix in buttermilk, vegetable oil, eggs, and vanilla extract until well combined. Gradually add hot water or coffee and mix until smooth.
-
Bake the cake: Transfer the batter to the prepared pan and bake for 30-35 minutes until a toothpick inserted in the center comes out clean. Cool the cake in the pan for 10 minutes, then transfer to a wire rack to cool completely before decorating.
-
Make the ganache: In a saucepan, heat the heavy cream until it simmers. Remove from heat and pour over chopped dark chocolate. Let sit for 2-3 minutes, then stir until smooth. Add butter and stir until fully mixed. Cool ganache until slightly thickened but still pourable.
-
Create the chocolate nest: 1. Microwave dark chocolate in 30-second intervals, stirring until smooth. Transfer to a piping bag. Pipe crisscrossing strands on parchment paper-lined tray to form a circular nest. Chill in the refrigerator for 15-20 minutes until firm.
-
Assemble the cake: Transfer the cooled cake to a serving platter. Drizzle chocolate ganache over the cake, allowing it to cascade down the sides. Gently remove the chocolate nest from the parchment paper and position it on the cake. Fill the nest with mini chocolate eggs before serving.