Follow Me On Social Media!

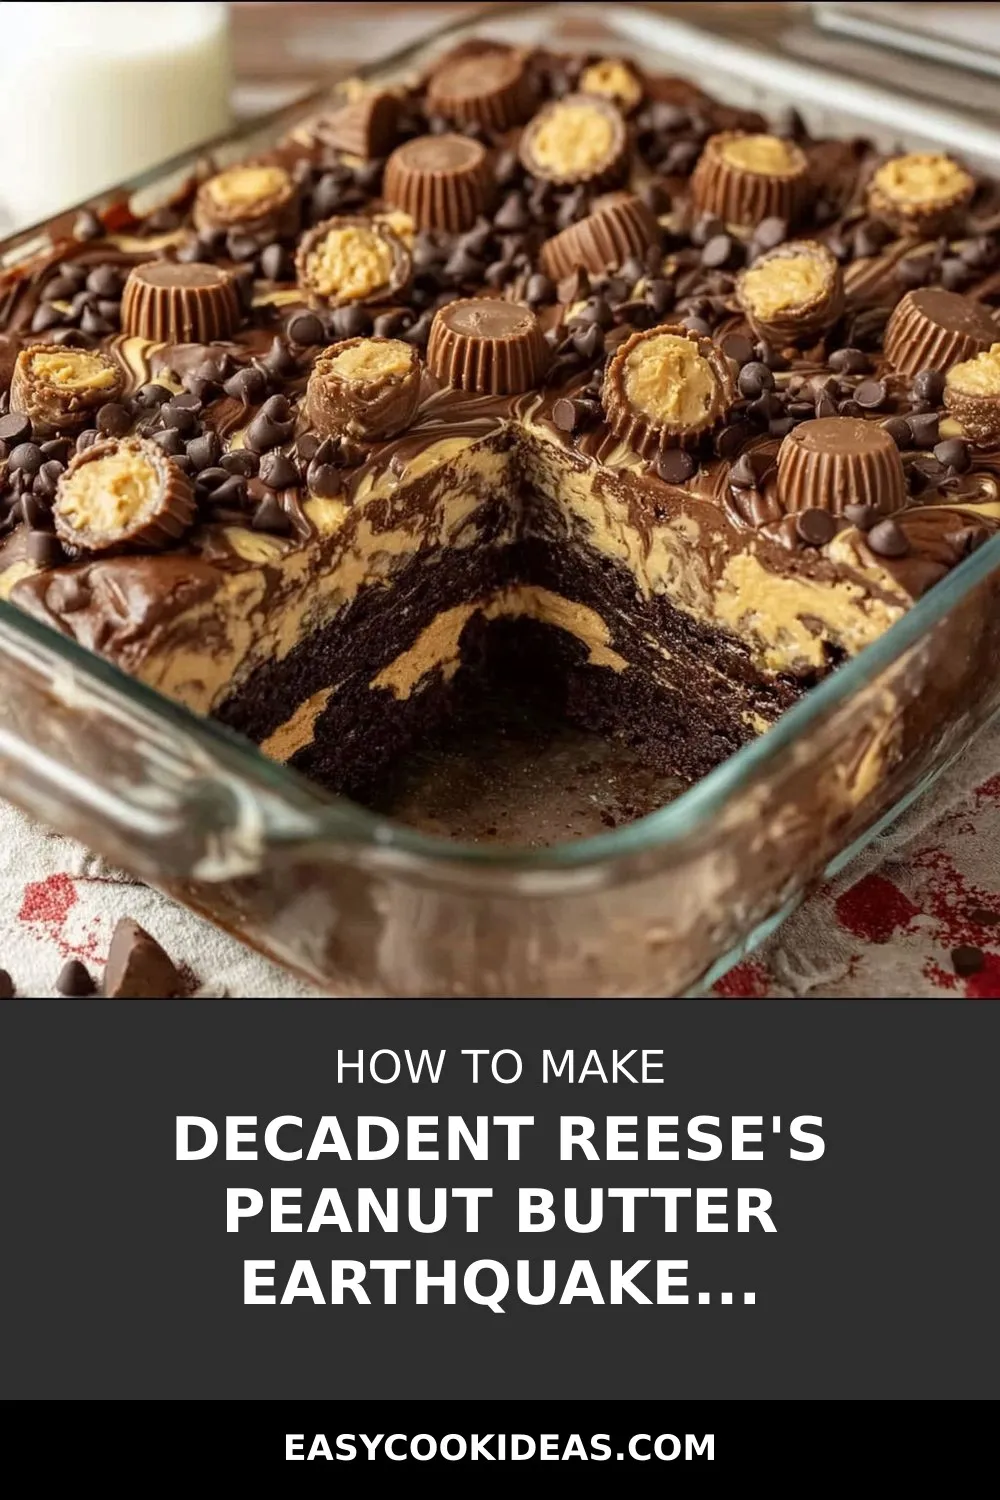
Indulge in the ultimate dessert experience with this show-stopping Reese’s Peanut Butter Earthquake Cake! Picture digging into a decadent chocolate peanut butter masterpiece that offers crackly edges, chewy swirls, and creamy bites of candy all in one delightful dish. Each slice is a symphony of melty chocolate pockets and tangy sweet peanut butter cream—a guaranteed crowd pleaser that will have everyone coming back for more.
I first introduced this irresistible treat at a family game night, and it was an instant hit with both kids and adults alike. The kind of cake that sparks legends and creates unforgettable moments around the table. The aroma of this cake baking in the oven is enough to bring the whole family flocking to the kitchen, eagerly awaiting the first slice.
This Reese’s Peanut Butter Earthquake Cake is not just a dessert; it’s a tradition in the making. Perfect for birthdays, potlucks, or any occasion where you want to spread joy through delicious food. Whether you serve it warm with a scoop of ice cream or chilled with a dollop of whipped cream, this cake is sure to become a staple in your recipe collection. Get ready to embark on a flavor journey that combines the best of chocolate, peanut butter, and a whole lot of love in every bite.
Quick Benefits
- Rich and Indulgent: This cake is a decadent combination of chocolate, peanut butter, and creamy swirls that make it a luxurious treat for any occasion.
- Crowd-Pleasing: A total favorite at potlucks and gatherings, this dessert is a guaranteed hit with its melty chocolate pockets and tangy peanut butter cream.
- Versatile: Easily customizable with ingredient swaps like almond butter, different types of chocolate, or gluten-free options, making it suitable for various dietary needs and preferences.
- Make-Ahead Friendly: Can be stored at room temperature for up to three days, or frozen for up to two months, allowing for easy preparation ahead of time for special celebrations or gatherings.
Why You’ll Love This Decadent Reese’s Peanut Butter Earthquake Cake Recipe
- Decadent Flavor Combination: Indulge in the rich and creamy peanut butter cream swirled with melty chocolate pockets, creating a perfect balance of sweetness and tanginess.
- Crowd-Pleasing Dessert: This cake is guaranteed to be a hit at potlucks, birthdays, or any gathering. It’s a dessert that will have everyone asking for seconds.
- Family Favorite: Create a family legend with this cake that disappears every time it’s brought out. Perfect for game nights, birthdays, or any occasion that calls for a show-stopping dessert.
- Easy Storage Options: Keep the cake covered at room temperature for up to three days, or freeze slices for up to two months. Enjoy a warm slice anytime by microwaving it for a few seconds.
- Versatile Recipe: Customize the cake by swapping ingredients like almond butter for peanut butter or using gluten-free cake mix. Experiment with different chocolate types for a unique twist.
- Perfect for Special Occasions: Serve warm slices with ice cream, fudge sauce, or whipped cream for an extra special touch. Add extra Reese’s cups or roasted salted peanuts for an indulgent presentation.
- Comfort and Celebration in Every Bite: Every slice of this cake is a blend of comfort and celebration, making it a go-to recipe for all your special occasions.
Ingredients for Decadent Reese’s Peanut Butter Earthquake Cake
For the Chocolate Cake Base
- Water as specified by cake mix instructions
- Oil as specified by cake mix instructions
- 1 box chocolate cake mix
- Eggs as required by cake mix instructions
- 120 g butter, melted
For the Peanut Butter Cream Swirl
- 125 g creamy peanut butter
- 225 g cream cheese, softened
- 2.5 ml vanilla extract
- 500 g powdered sugar
Toppings
- 90 g semi-sweet chocolate chips
- 180 g mini peanut butter cups, halved
Pro Tips for Decadent Reese’s Peanut Butter Earthquake Cake
For the Reese’s Peanut Butter Earthquake Cake, a pro tip is to dollop the peanut butter cream mixture over the chocolate batter without mixing it. This technique creates the distinct swirls and cracks as the cake bakes, resulting in a visually appealing and deliciously textured dessert.
When making this cake, consider experimenting with different chocolate blends for a unique twist. While the classic chocolate provides a great contrast with the peanut butter and Reese’s candies, using your favorite chocolate variations can add an exciting flavor dimension to the cake.
Whether you prefer a warm and gooier texture or a cooled slice that holds its shape for tidier servings, both ways of enjoying this cake are delicious. Simply cool the cake fully, cover it, and store it for later enjoyment. You can either serve it at room temperature or lightly reheat it before serving to enhance the flavors.
How to Make Decadent Reese’s Peanut Butter Earthquake Cake
Step 1: Preheat and Prepare Baking Dish
Preheat oven to 175°C and lightly grease a 23 x 33 cm glass baking dish.
Step 2: Prepare Cake Batter
Prepare the chocolate cake batter as directed on the package by adding water, oil, and eggs. Mix until smooth and pour into the baking dish.
Step 3: Mix Peanut Butter Cream
In a large bowl, mix softened cream cheese and melted butter until smooth. Add peanut butter and vanilla extract, mix well. Gradually stir in powdered sugar until creamy and thick.
Step 4: Create Swirl Layer
Drop spoonfuls of the peanut butter cream mixture onto the cake batter, creating visible swirls without fully mixing it in.
Step 5: Add Toppings
Sprinkle semi-sweet chocolate chips and halved mini peanut butter cups evenly over the batter. Press some pieces lightly into the batter, leaving most on the surface.
Step 6: Bake
Bake for 45 to 55 minutes, or until the edges are set, the top is cracked, and the center is slightly firm with a gentle jiggle. Monitor closely during the final minutes as baking times may vary.
Step 7: Cool and Serve
Let cool briefly before serving. Enjoy warm for a gooey texture, or cool completely for neat slices.
📌 Pin for later!
Storage Tips
Once you have enjoyed your decadent Reese’s Peanut Butter Earthquake Cake, you can store any leftover slices at room temperature for up to three days. Simply cover the cake to protect its freshness. If you wish to keep it for a longer period, individually wrap the slices in foil or place them in an airtight container and freeze them for up to two months. When ready to enjoy a slice, you can heat it in the microwave for 10 to 15 seconds to have that warm, fresh-from-the-oven feel. Consider adding an extra drizzle of peanut butter or chocolate chips for an extra indulgent touch.
For a variation on the recipe, you can experiment with almond butter instead of peanut butter or use a gluten-free chocolate cake mix to accommodate dietary preferences. If you run out of cream cheese, mascarpone can be a rich substitute. Additionally, feel free to swap in dark chocolate chips or chopped chocolate bars if that is what you have available. This versatile recipe allows for personalization while still retaining its irresistible combination of chocolate, peanut butter, and Reese’s cups. Whether for a casual gathering or a special celebration, this cake is sure to delight your friends and family with every slice.
Ingredient Substitutions
For a different flavor profile, consider swapping almond butter for peanut butter in this recipe. It will provide a nutty twist that complements the chocolate cake well. Additionally, if you or someone you are baking for has dietary restrictions, you can opt for a gluten-free chocolate cake mix to make this dessert suitable for those needs.
If you happen to run out of cream cheese, you can use mascarpone as a rich and indulgent substitute. The creamy texture of mascarpone will still provide a tangy contrast to the chocolate cake and peanut butter layers. Similarly, if you don’t have semi-sweet chocolate chips on hand, feel free to use dark chocolate chips or chopped chocolate bars as an alternative for the same melty chocolate effect in the cake.
Whether you choose to serve this Reese’s Peanut Butter Earthquake Cake warm or cooled, both ways offer delightful textures and flavors. A warm slice will be gooier and perfect for a comforting dessert, while cooled slices hold their shape well for neater servings. If you have leftovers, simply cool the cake fully, cover it, and store it at room temperature or in the freezer for longer enjoyment.
Serving Suggestions
For a fun and indulgent serving suggestion, try plating slices of the Reese’s Peanut Butter Earthquake Cake with a generous scoop of creamy vanilla ice cream on the side. The warm cake paired with the cold ice cream creates a delightful contrast in temperatures and textures, making every bite a heavenly experience.
To take the presentation up a notch, drizzle each slice of the cake with warm fudge sauce and top it off with a dollop of freshly whipped cream. The combination of rich chocolate, creamy peanut butter, and decadent toppings will elevate this dessert into a show-stopping treat perfect for any special occasion or gathering.
FAQs for Decadent Reese’s Peanut Butter Earthquake Cake
Can I use a different type of nut butter in this recipe?
Yes, you can swap almond butter for peanut butter for a different flavor twist in the Reese’s Peanut Butter Earthquake Cake.
Should I serve this cake warm or cooled?
Both ways are delicious! Serving the cake warm yields a gooier texture, while serving it cooled allows the slices to hold their shape for tidier servings.
How should I store the Reese’s Peanut Butter Earthquake Cake?
You can store the cake covered at room temperature for up to three days. For longer storage, wrap individual slices in foil or an airtight container and freeze them for up to two months. Simply microwave a frozen slice for ten to fifteen seconds for a warm treat.
Can I make this cake ahead of time?
Absolutely! You can make the cake ahead of time, cool it fully, cover it, and store it until you are ready to serve. Enjoy the cake at room temperature or lightly reheat it before serving.
Conclusion
In conclusion, Reese’s Peanut Butter Earthquake Cake is a true showstopper that will have your friends and family coming back for more. Its rich, decadent flavors and melty chocolate pockets combined with tangy peanut butter cream make it a dessert to remember. Whether you’re celebrating a special occasion or simply craving a comforting treat, this cake is sure to be a hit.
Don’t hesitate to customize this recipe to suit your preferences. Whether you swap ingredients or try different serving suggestions, the versatility of Reese’s Peanut Butter Earthquake Cake makes it a versatile and delicious dessert option. So go ahead, bake up a batch of this irresistible cake and watch as it becomes a new family favorite for all your gatherings.
📌 Pin for later!
Decadent Reese’s Peanut Butter Earthquake Cake
Indulge in the irresistible Reese’s Peanut Butter Earthquake Cake—a gooey chocolate peanut butter delight sure to become a family favorite!
Prep Time20 Minutes
Cook Time55 Minutes
Total Time75 Minutes
CuisineAmerican
Skill LevelEasy
Servings16 Servings (1 tray, 16 servings)
Ingredients
For the Chocolate Cake Base
- Water as specified by cake mix instructions
- Oil as specified by cake mix instructions
- 1 box chocolate cake mix
- Eggs as required by cake mix instructions
- 120 g butter, melted
For the Peanut Butter Cream Swirl
- 125 g creamy peanut butter
- 225 g cream cheese, softened
- 2.5 ml vanilla extract
- 500 g powdered sugar
Toppings
- 90 g semi-sweet chocolate chips
- 180 g mini peanut butter cups, halved
Instructions
-
Preheat and Prepare Baking Dish: Preheat oven to 175°C and lightly grease a 23 x 33 cm glass baking dish.
-
Prepare Cake Batter: Prepare the chocolate cake batter as directed on the package by adding water, oil, and eggs. Mix until smooth and pour into the baking dish.
-
Mix Peanut Butter Cream: In a large bowl, mix softened cream cheese and melted butter until smooth. Add peanut butter and vanilla extract, mix well. Gradually stir in powdered sugar until creamy and thick.
-
Create Swirl Layer: Drop spoonfuls of the peanut butter cream mixture onto the cake batter, creating visible swirls without fully mixing it in.
-
Add Toppings: Sprinkle semi-sweet chocolate chips and halved mini peanut butter cups evenly over the batter. Press some pieces lightly into the batter, leaving most on the surface.
-
Bake: Bake for 45 to 55 minutes, or until the edges are set, the top is cracked, and the center is slightly firm with a gentle jiggle. Monitor closely during the final minutes as baking times may vary.
-
Cool and Serve: Let cool briefly before serving. Enjoy warm for a gooey texture, or cool completely for neat slices.