Follow Me On Social Media!
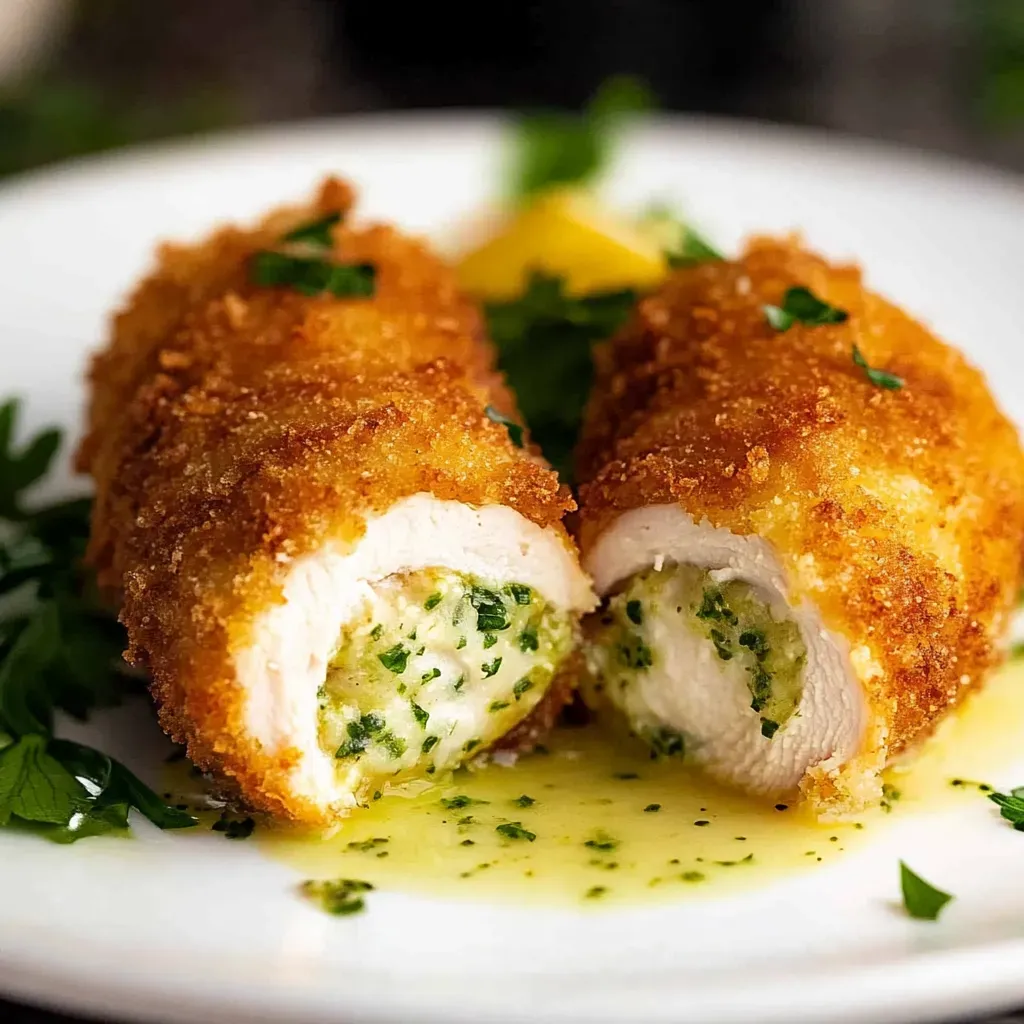
Get ready to elevate your dinner game with a show-stopping dish that’s sure to impress – Crispy Chicken with Herb Butter. This recipe takes juicy chicken breasts, coats them in a crunchy panko breadcrumb crust, and stuffs them with a decadent herb butter mixture that oozes out with each bite. The secret to keeping all that buttery goodness sealed inside? Partially freezing the chicken before cooking.
I first discovered the magic of Crispy Chicken with Herb Butter when I made it for a special anniversary dinner. The reaction from my husband was priceless – he declared it better than any restaurant version we’d ever tried. Now, this dish has become a beloved tradition in our home, requested by friends and family whenever they come to visit. The moment you cut into the golden, crispy exterior of the chicken and see the herb butter melting out is pure culinary bliss.
Whether you’re planning a special occasion meal or just want to treat yourself to something delicious, Crispy Chicken with Herb Butter is a must-try. With a perfect blend of textures and flavors, this dish is sure to become a new favorite at your dinner table. So, roll up your sleeves, get ready to cook, and prepare to be wowed by this unforgettable recipe.
Quick Benefits
- Retains Juiciness: Partially freezing the chicken before cooking helps seal in the garlic butter, ensuring a juicy and flavorful bite every time.
- Make-ahead Convenience: Prepare the Chicken Kiev in advance and freeze for up to one month, or refrigerate for up to 24 hours before cooking, making it ideal for special occasions or meal prep.
- Healthier Option: Opt for a baked version by using pre-toasted breadcrumbs sprayed with oil, offering a lighter alternative to the traditional deep-fried method.
- Culinary Tradition: Chicken Kiev’s rich history and origins in French and Russian cuisine make it a classic dish that has stood the test of time, representing culinary diplomacy and perfected technique.
Why You’ll Love This Herb Butter Crispy Chicken Recipe Recipe
- Restaurant-Quality Dish at Home: Impress your guests or loved ones with a Chicken Kiev recipe that rivals any restaurant version.
- Buttery Garlic Explosion: Experience the culinary magic of cutting into a crispy chicken breast and watching a river of garlic butter flow out onto your plate.
- Family Tradition: Start a special occasion tradition with a dish that everyone will request when they visit, just like the blogger’s family.
- Make Ahead and Freeze: Perfect for planning special dinners in advance – freeze the prepared chicken for up to one month and enjoy a stress-free meal.
- Culinary Diplomacy: Delve into the history of Chicken Kiev, a dish that represents culinary diplomacy and has remained essentially unchanged for generations due to its perfected technique.
- Crispy Perfection: Achieve crispy textures and molten butter that ignite your taste buds with every bite of this chicken dish.
- Healthier Option Available: For a healthier twist, try the baked method using pre-toasted breadcrumbs instead of deep-frying.
- Easy Handling Tips: Learn the importance of partially freezing the chicken and how to pound it to an even thickness for secure butter sealing.
- Perfectly Cooked Chicken: Follow the temperature guidelines to ensure your chicken Kiev is cooked through but still juicy, with the butter completely melted inside.
- Serving Suggestions: Pair your Chicken Kiev with mashed potatoes, steamed vegetables, a green salad, or rice pilaf for a well-balanced and delicious meal.
Ingredients for Herb Butter Crispy Chicken Recipe
Garlic Butter Stuffing
- 1/4 tsp salt (omit if using salted butter)
- 2 garlic cloves, very finely minced (2 tsp)
- 2 tsp finely chopped parsley
- 90g unsalted butter, softened
Chicken
- 2 chicken breasts (220-250g each), skinless and boneless
- Canola or vegetable oil for frying (~1 litre)
- 1/2 tsp salt
- 1 cup panko breadcrumbs
- 1/4 cup flour
- 1/4 tsp pepper
- 1 egg, lightly whisked
Serving
- Finely chopped parsley for garnish
Pro Tips for Herb Butter Crispy Chicken Recipe
Pro Tip 1: For the perfect Chicken Kiev, partially freeze the chicken breasts before assembling. This step ensures the buttery filling stays sealed inside during cooking, creating that signature molten butter experience when you cut into the crispy chicken.
Pro Tip 2: Want a healthier twist? Use pre-toasted breadcrumbs for a baked version of Chicken Kiev. Simply coat the chicken with these crumbs and bake until golden for a lighter yet still delicious dish. This method delivers a crispy exterior and flavorful herb butter without deep-frying.
Pro Tip 3: To ensure your Chicken Kiev is cooked to perfection, use a meat thermometer to check the internal temperature. Aim for 65°C/150°F after frying and baking. Remember to pierce the top of the chicken to prevent butter leakage and ensure the meat is juicy and fully cooked. Serve your Chicken Kiev with classic sides like mashed potatoes, steamed veggies, or a fresh salad to complement its rich flavors.
How to Make Herb Butter Crispy Chicken Recipe
Step 1: Prepare Garlic Butter
Mix softened butter with chopped parsley, minced garlic, and salt until well combined.
Step 2: Shape Butter
Place the butter mixture on a small sheet of parchment paper and shape it into a 10 x 6cm rectangle. Chill until firm, then cut into two batons lengthwise.
Step 3: Prepare Chicken
Place the chicken breast between two freezer bags or parchment paper, smooth side down. Pound to 0.5cm thickness using a meat mallet.
Step 4: Season
Season both sides of the flattened chicken with salt and pepper.
Step 5: Stuff and Roll
Put a butter stick in the center of each chicken breast. Fold the sides over the butter, then roll up the chicken starting from the bottom, and place it seam side down.
Step 6: Partial Freeze
Individually wrap each chicken roll tightly in plastic wrap, twisting the ends to form a log shape. Freeze for 30 minutes until the surface is firm but not completely frozen.
Step 7: Bread Chicken
Prepare three bowls with flour, beaten egg, and breadcrumbs. Coat each chicken roll in flour, egg, and breadcrumbs, pressing gently to coat evenly.
Step 8: Second Freeze
Place the breaded chicken back in the freezer for 30 minutes until slightly firm.
Step 9: Preheat
Preheat the oven to 180°C and position a rack on a baking tray.
Step 10: Fry
In a heavy-based pot, heat oil to 190°C. Carefully place chicken in the oil and cook until golden, turning occasionally, for 2-3 minutes.
Step 11: Bake
Place the chicken on the prepared rack and bake for 15 minutes or until it reaches an internal temperature of 65°C. Make small incisions on top to prevent butter from leaking.
Step 12: Rest and Serve
Let it rest for 2 minutes before serving. Optional: garnish with fresh parsley.
📌 Pin for later!

Storage Tips
After preparing the Chicken Kiev, if you have leftovers or want to make it ahead of time, you can store the cooked dish in the refrigerator for up to 3-4 days. Place the Chicken Kiev in an airtight container or wrap it tightly with plastic wrap to help maintain its crispy coating and preserve its flavors. When ready to enjoy, you can reheat the Chicken Kiev in the oven at a low temperature to ensure it stays crispy and the butter inside remains melted and flavorful.
If you want to make Chicken Kiev ahead of time and freeze it, you can do so by wrapping the breaded, uncooked chicken tightly in plastic wrap and then foil. The frozen Chicken Kiev can be stored for up to one month. When you’re ready to cook it, thaw the chicken in the refrigerator overnight and then proceed with the frying and baking steps as usual. This make-ahead method is perfect for planning special dinners or having a delicious meal ready with minimal effort.
When serving Chicken Kiev, consider pairing it with sides that complement its rich flavors. Traditional options like mashed potatoes, steamed green vegetables, or a simple green salad work well to balance the richness of the dish. These sides not only enhance the dining experience but also help soak up any escaped garlic butter, making for a delicious and satisfying meal.
Ingredient Substitutions
If you prefer a healthier version of this Chicken Kiev recipe, consider using pre-toasted breadcrumbs coated with oil and baked until golden instead of deep-frying. This alternative method can still result in a deliciously crispy coating without the need for frying.
For ingredient substitutions, if you don’t have unsalted butter on hand, you can use salted butter and omit the additional salt in the recipe. Additionally, if you’re out of parsley, you can try using other herbs like chives, tarragon, or dill to flavor the butter mixture for a unique twist on the classic recipe.
Serving Suggestions
For a stunning presentation, serve the Crispy Chicken with Herb Butter on a bed of creamy mashed potatoes, allowing the melted garlic butter to seep into the fluffy potatoes for a decadent bite. Garnish with a sprinkle of freshly chopped parsley to add a pop of color and freshness to the dish. To balance out the richness, pair this indulgent meal with a side of steamed asparagus or green beans drizzled with a squeeze of lemon juice.
To elevate the experience, turn your Crispy Chicken with Herb Butter into a gourmet sandwich by placing a generous slice of the golden-brown chicken between two pieces of toasted brioche buns. The herb-infused butter oozing out with each bite creates a flavorful and juicy sandwich that will impress any guest. Serve with a side of tangy coleslaw or a crisp arugula salad dressed with a light vinaigrette to complete this elevated take on a classic comfort food.
FAQs for Herb Butter Crispy Chicken Recipe
Can I make Chicken Kiev ahead of time?
Yes! You can prepare the stuffed and crumbed chicken up to 24 hours ahead and keep it refrigerated. You can also freeze the prepared Kiev for up to 3 months – just thaw overnight in the refrigerator before cooking. This makes it perfect for meal prep or entertaining.
What sides go well with Chicken Kiev?
Chicken Kiev pairs wonderfully with mashed potatoes (which can soak up any escaped butter), steamed vegetables like green beans or asparagus, a simple green salad, or rice pilaf. A light side dish balances the richness of the Kiev perfectly.
What is the importance of partially freezing the chicken in this recipe?
Partially freezing the chicken is crucial as it firms up the meat, preventing the seams from shifting during handling, coating, and frying. This technique ensures the butter stays securely sealed inside and doesn’t leak out during cooking.
Is there a healthier alternative to deep-frying Chicken Kiev?
Yes! For a healthier version, you can use pre-toasted breadcrumbs that have been sprayed with oil and baked until golden. Coat the chicken with these toasted crumbs and bake for about 20 minutes. While traditional Kiev is deep-fried, this baked method still delivers great results.
Conclusion
In conclusion, this Crispy Chicken with Herb Butter recipe is a true labor of love that is sure to impress your loved ones on any special occasion. The combination of crispy golden chicken with a burst of flavorful herb butter is a culinary experience that never fails to delight.
Remember, the key to success with this dish lies in the little details – from partially freezing the chicken to ensuring a perfect seal to prevent the butter from leaking out. Whether you choose to fry or bake your Chicken Kiev, the end result will be a mouthwatering masterpiece that is well worth the effort. So go ahead, roll up your sleeves, and treat yourself to the deliciousness of Crispy Chicken with Herb Butter – you won’t be disappointed!
📌 Pin for later!
Herb Butter Crispy Chicken Recipe
Indulge in the magical combination of crispy chicken and molten garlic butter with this classic Chicken Kiev recipe, a dish fit for special occasions and culinary perfection.
Prep Time30 Minutes
Cook Time30 Minutes
Total Time60 Minutes
CuisineRussian
Skill LevelEasy
Servings2 Servings (2 stuffed chicken breasts)
Ingredients
Garlic Butter Stuffing
- 1/4 tsp salt (omit if using salted butter)
- 2 garlic cloves, very finely minced (2 tsp)
- 2 tsp finely chopped parsley
- 90g unsalted butter, softened
Chicken
- 2 chicken breasts (220-250g each), skinless and boneless
- Canola or vegetable oil for frying (~1 litre)
- 1/2 tsp salt
- 1 cup panko breadcrumbs
- 1/4 cup flour
- 1/4 tsp pepper
- 1 egg, lightly whisked
Serving
- Finely chopped parsley for garnish
Instructions
-
Prepare Garlic Butter: Mix softened butter with chopped parsley, minced garlic, and salt until well combined.
-
Shape Butter: Place the butter mixture on a small sheet of parchment paper and shape it into a 10 x 6cm rectangle. Chill until firm, then cut into two batons lengthwise.
-
Prepare Chicken: Place the chicken breast between two freezer bags or parchment paper, smooth side down. Pound to 0.5cm thickness using a meat mallet.
-
Season: Season both sides of the flattened chicken with salt and pepper.
-
Stuff and Roll: Put a butter stick in the center of each chicken breast. Fold the sides over the butter, then roll up the chicken starting from the bottom, and place it seam side down.
-
Partial Freeze: Individually wrap each chicken roll tightly in plastic wrap, twisting the ends to form a log shape. Freeze for 30 minutes until the surface is firm but not completely frozen.
-
Bread Chicken: Prepare three bowls with flour, beaten egg, and breadcrumbs. Coat each chicken roll in flour, egg, and breadcrumbs, pressing gently to coat evenly.
-
Second Freeze: Place the breaded chicken back in the freezer for 30 minutes until slightly firm.
-
Preheat: Preheat the oven to 180°C and position a rack on a baking tray.
-
Fry: In a heavy-based pot, heat oil to 190°C. Carefully place chicken in the oil and cook until golden, turning occasionally, for 2-3 minutes.
-
Bake: Place the chicken on the prepared rack and bake for 15 minutes or until it reaches an internal temperature of 65°C. Make small incisions on top to prevent butter from leaking.
-
Rest and Serve: Let it rest for 2 minutes before serving. Optional: garnish with fresh parsley.