Follow Me On Social Media!
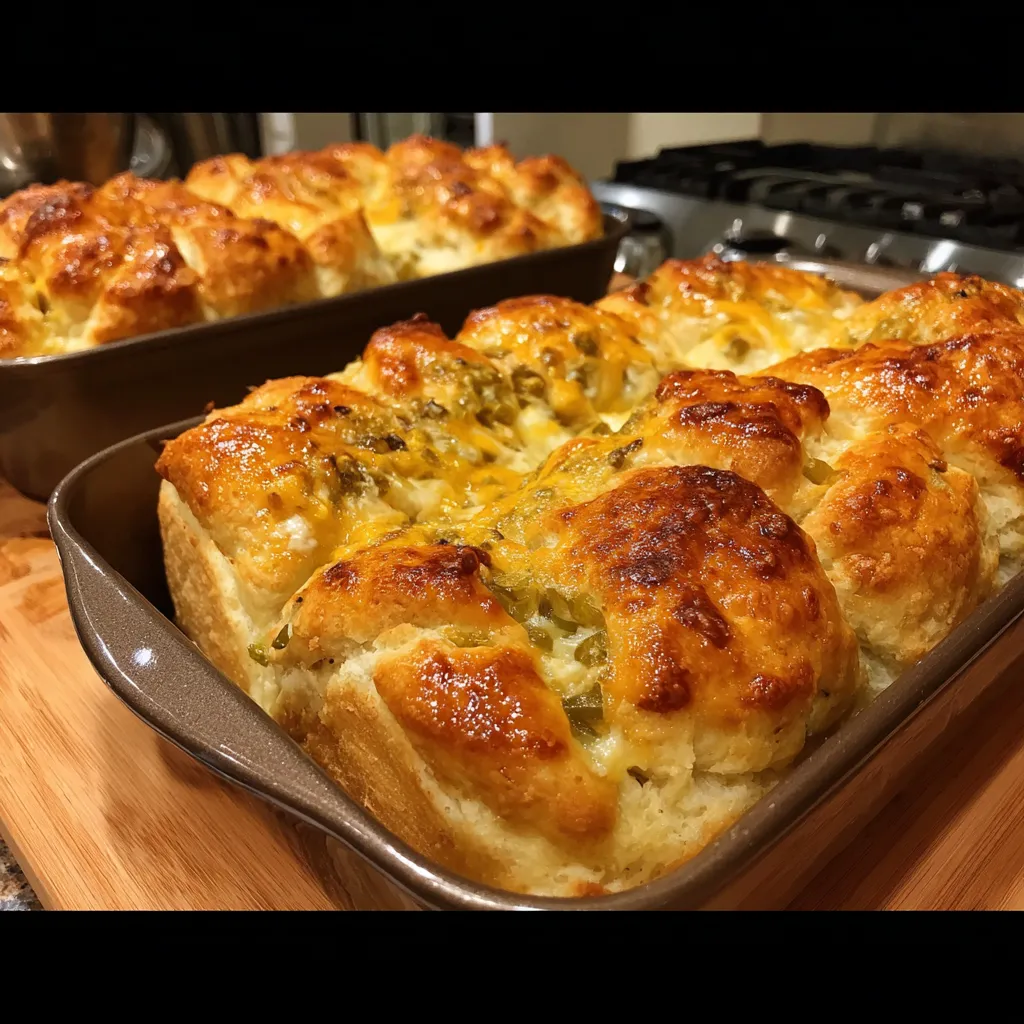
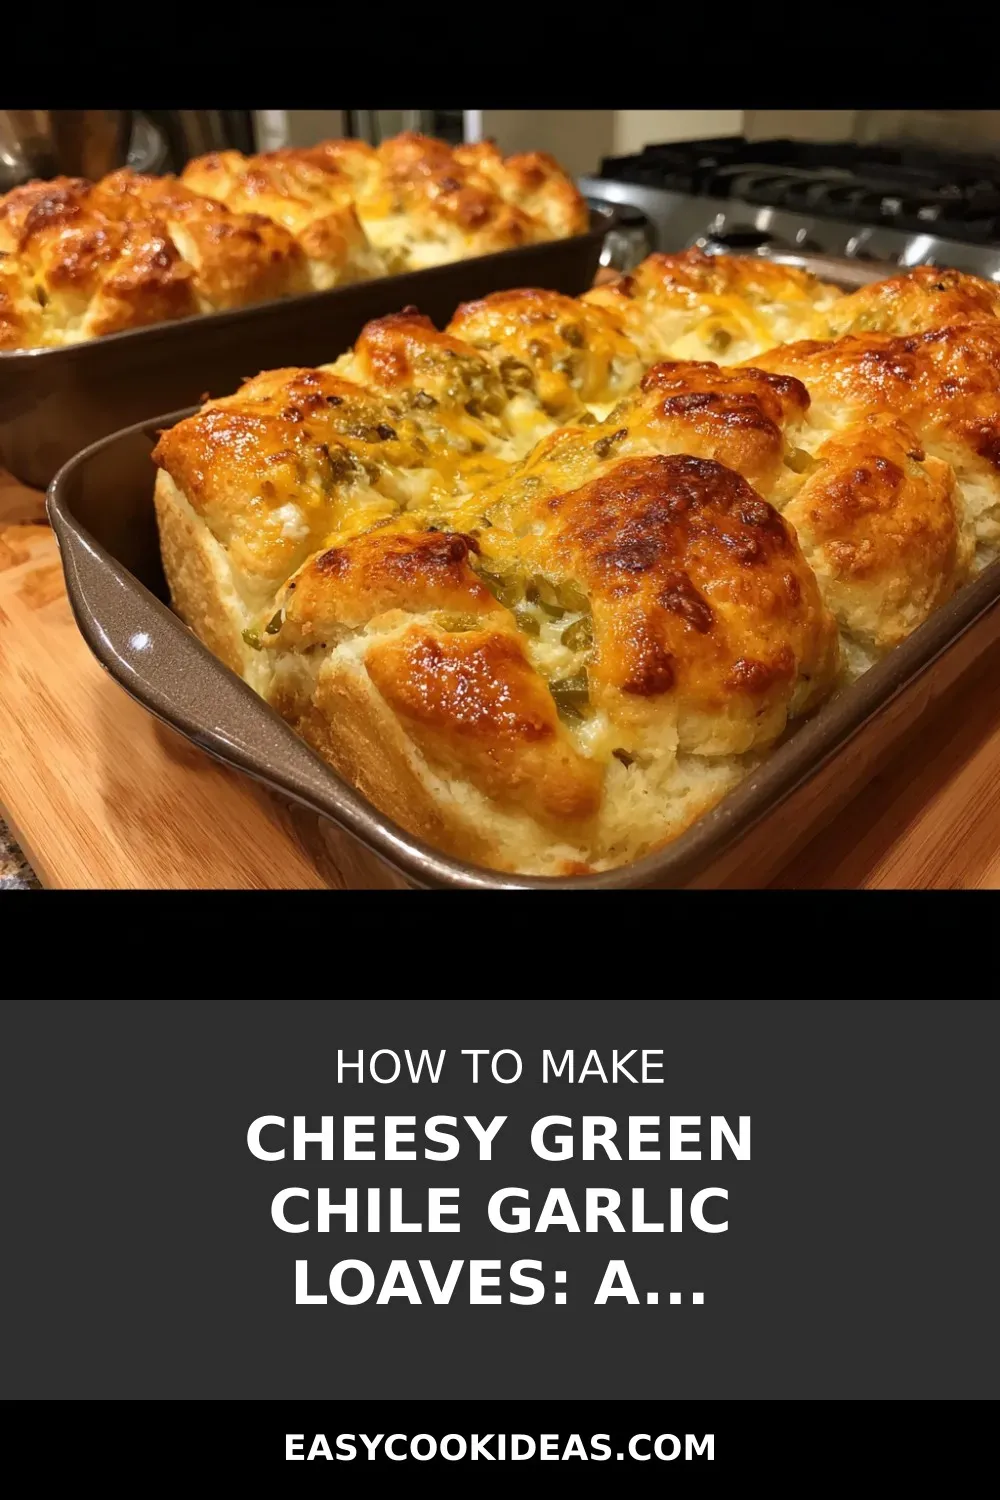
Looking to add a little pizzazz to your next gathering or game day spread? Look no further than these Green Chile Cheese Garlic Loaves! Picture this: fluffy golden biscuit pieces oozing with a blend of cheddar and Colby Monterey Jack cheese, all punctuated with the gentle heat of diced green chile peppers. But wait, it gets even better – a garlicky butter drizzle that seeps through every bite, transforming this pull-apart loaf into an irresistible treat that will have everyone coming back for more.
I can’t count the number of times I’ve made these Green Chile Cheese Garlic Loaves, only for them to disappear before the other dishes even make it to the table. The combination of gooey cheese, subtle spice, and savory garlic butter is simply unbeatable. And the best part? These loaves are so versatile – serve them alongside scrambled eggs for brunch, as a tasty side to a bowl of spicy chili, or as a party appetizer that will steal the show. Trust me, once you try this recipe, it’ll become a staple in your entertaining repertoire.
Don’t be afraid to get creative with this recipe – swap in different cheeses for varied flavors, or try jarred roasted red peppers for a sweet twist. Whether you’re a seasoned chef or a kitchen novice, these Green Chile Cheese Garlic Loaves are a foolproof way to wow your guests and add a touch of cheesy, garlicky goodness to any occasion. So go ahead, whip up a batch, serve it warm, and watch as it disappears in a matter of minutes – because good food, especially when it involves cheese and garlic, is always worth savoring.
Quick Benefits
- Perfect for game days, gatherings, or as a savory snack anytime
- Gooey cheese and gentle heat from green chiles for a flavorful bite
- Easy to customize with different cheese options for varied flavors
- Make-ahead friendly – assemble in advance and bake just before serving
Why You’ll Love This Cheesy Green Chile Garlic Loaves: A Savory Delight! Recipe
- Irresistible Flavor Combination: The combination of fluffy biscuits, gooey cheese, tangy green chiles, and garlic butter creates a flavor explosion that will keep you coming back for more.
- Perfect for Sharing: This pull-apart loaf is a crowd-pleaser and ideal for gatherings, game days, or as a savory snack for sharing with friends and family.
- Easy and Quick to Make: Using canned biscuits as a shortcut makes this recipe a breeze to put together, perfect for when you need a comforting treat without spending hours in the kitchen.
- Versatile and Customizable: You can easily customize this recipe by swapping cheeses, adjusting the level of heat with different peppers, or adding extra toppings like roasted red peppers for a sweet twist.
- Stores Well: Leftover loaves can be stored in the fridge for up to three days, and reheating in the oven helps maintain the fresh-baked texture.
- Pairs Well with Various Dishes: Serve this loaf as an appetizer, alongside brunch dishes, or as a comforting side to complement dishes like chili or barbecue – it’s a versatile addition to any meal.
- Honoring Culinary Traditions: With a nod to New Mexican culinary tradition, the use of green chiles in this recipe adds a smoky, gentle heat that elevates the dish and adds a touch of regional flair.
Ingredients for Cheesy Green Chile Garlic Loaves: A Savory Delight!
Dough and Fillings
- 250 grams cheddar cheese, shredded
- 115 grams canned diced green chile peppers, drained
- 2 cans jumbo refrigerated biscuits (total 16 pieces)
- 250 grams Colby Monterey Jack cheese, shredded
Garlic Butter
- 3 tablespoons unsalted butter, melted
- 2 cloves garlic, finely minced
For the Pan
- Nonstick cooking spray
Pro Tips for Cheesy Green Chile Garlic Loaves: A Savory Delight!
For an extra cheesy and gooey loaf, consider adding extra shards of cheese between the top biscuits before baking. This will create a bonus melt and make each bite even more indulgent. Additionally, if you enjoy a crispy texture, let the edges of the loaf get extra crispy at the corners for added texture and flavor.
To elevate the flavor profile of the dish, feel free to experiment with different cheese options. Try using pepper jack cheese for a spicier kick or mozzarella for a milder taste. You can also swap out the green chiles for jarred roasted red peppers for a sweet twist. Don’t be afraid to get creative with your ingredients to customize the loaf to your preferences and taste.
When reheating leftovers, opt for the oven over the microwave to maintain the fresh-baked texture of the pull apart loaf. Heat the loaf at 325°F until warmed through for the best results. This will ensure that the bread stays soft and delicious, avoiding the risk of making the biscuits tough. By following these tips, you can enjoy a flavorful and satisfying dish that is perfect for any occasion.
How to Make Cheesy Green Chile Garlic Loaves: A Savory Delight!
Step 1: Preheat the Oven
Preheat the oven to 175°C (350°F).
Step 2: Prepare Biscuits
Open the biscuit cans and separate into 16 individual biscuits. Cut each biscuit into 4 even pieces using a knife or kitchen scissors.
Step 3: Combine Biscuits and Filling
Combine the biscuit pieces with shredded cheddar, Colby Monterey Jack cheese, and drained diced green chile peppers in a large mixing bowl, tossing gently until evenly distributed.
Step 4: Make Garlic Butter
In a small bowl, mix melted unsalted butter with minced garlic. Drizzle over biscuit and cheese mixture, then toss to coat evenly.
Step 5: Assemble in Pan
Spray a 23 x 33 cm (9 x 13 inch) baking dish with nonstick spray. Spread the prepared biscuit mixture evenly into the dish, making sure to reach the corners.
Step 6: Bake
Place the baking dish on the center rack and bake for 25 to 30 minutes until the biscuits have expanded and the surface is golden brown.
Step 7: Rest and Serve
Take the dish out of the oven and let it rest for 10 minutes before serving to maintain structure and reach the ideal temperature.
📌 Pin for later!
Storage Tips
Once you have made the Green Chile Cheese Garlic Loaves, any leftovers can be stored covered in the refrigerator for up to three days. To maintain the fresh-baked texture when reheating, it is best to warm the loaf in the oven at 325°F until it is heated through. Avoid using the microwave if possible as it can make the biscuits tough.
If you want to enhance the flavors or customize the dish, you can experiment with different types of cheese like mozzarella or pepper jack for extra taste variations. Additionally, you can swap the green chiles for jarred roasted red peppers for a sweet twist, or substitute the refrigerated biscuits with pizza dough or small dinner rolls in a pinch. The Green Chile Cheese Garlic Loaves can be served as a party appetizer, alongside brunch dishes, or as a comforting side to complement spicy chili, and they pair well with accompaniments like fresh salsa, sour cream, or chopped green onions.
When making this cheesy pull-apart loaf for a gathering, it is a good idea to assemble it in advance, cover it, and refrigerate it until you are ready to bake and serve. To keep the bread moist when warming it, you can cover it with foil while heating it in a low oven or microwave until it is heated through. This delicious dish is versatile and perfect for game days, brunches, or casual meals where you want a comforting and shareable treat that will be sure to disappear quickly.
Ingredient Substitutions
If you prefer a different type of cheese, you can easily swap out the cheddar or Colby Monterey Jack for your favorite melting cheese such as mozzarella or pepper jack. This will give the loaf a slightly different flavor profile while still maintaining its gooey, cheesy goodness.
For a spicier kick, consider using hot green chiles or adding sliced jalapeños to the loaf. This will elevate the heat level and add a different dimension of flavor to the dish, perfect for those who enjoy a bit of extra spice in their food.
If you don’t have jumbo refrigerated biscuits on hand, you can substitute with refrigerated pizza dough or small dinner rolls as mentioned in the article. This can be a convenient alternative if you need to make do with what you have in your pantry. Just adjust the baking time accordingly to ensure they are cooked through and golden brown.
Serving Suggestions
To elevate the presentation of these Green Chile Cheese Garlic Loaves, try serving them on a rustic wooden board lined with fresh green chile peppers for a pop of color. You could also drizzle some extra garlic butter on top before serving to enhance the aroma and flavor.
For a fun twist, consider creating a dipping station with bowls of zesty salsa, creamy sour cream, and tangy green onions to complement the cheesy, garlicky goodness of the loaf. This interactive setup will not only add a burst of flavors but also encourage guests to customize their bites, making it a hit at any gathering or game day event.
FAQs for Cheesy Green Chile Garlic Loaves: A Savory Delight!
Can I prepare this green chile cheese garlic loaf in advance?
Yes, you can assemble the loaf in advance, cover it, and store it in the refrigerator until you’re ready to bake it. This way, you can have fresh, warm pull-apart bread just before serving.
How should I reheat leftover green chile cheese garlic loaf?
The best way to reheat the leftover loaf is in the oven at 325°F until warmed through. This method helps maintain the fresh-baked texture without making the biscuits tough. Avoid microwaving if possible.
What are some cheese alternatives I can use in this recipe?
You can substitute or mix in mozzarella, pepper jack, or your favorite melting cheeses for extra flavor. Feel free to experiment with different cheese combinations to suit your taste.
What are some serving suggestions for this green chile cheese garlic loaf?
These loaves pair well with soups, chili, salads, or as a cheesy side for barbecue and casual meals. They can also be served as a party appetizer, alongside scrambled eggs for brunch, or with fresh salsa, sour cream, or chopped green onions for added flavor.
Conclusion
Green Chile Cheese Garlic Loaves are truly a crowd-pleaser that disappears quickly at any gathering. The fluffy biscuits, gooey cheese, and subtle heat from the green chiles make this pull-apart loaf a comforting and irresistible treat. Whether you’re hosting a game day party, brunch with friends, or simply craving a savory snack, these loaves are sure to bring smiles to everyone’s faces.
Don’t be afraid to get creative with your Green Chile Cheese Garlic Loaves! You can customize the level of heat by using hotter chiles or adding jalapeños. Experiment with different cheeses like mozzarella or pepper jack to tailor the flavor to your liking. This versatile dish pairs beautifully with a variety of sides and can be enjoyed in numerous ways, making it a go-to recipe for any occasion. So go ahead, whip up a batch of these delicious loaves, serve them warm, and watch them disappear before your eyes!
📌 Pin for later!
Cheesy Green Chile Garlic Loaves: A Savory Delight!
“Fluffy biscuit loaves oozing with cheddar, Monterey Jack, and green chiles, drenched in garlicky butter – a cheesy, crave-worthy comfort snack.”
Prep Time15 Minutes
Cook Time30 Minutes
Total Time45 Minutes
CuisineAmerican
Skill LevelEasy
Servings8 Servings (1 pull-apart loaf)
Ingredients
Dough and Fillings
- 250 grams cheddar cheese, shredded
- 115 grams canned diced green chile peppers, drained
- 2 cans jumbo refrigerated biscuits (total 16 pieces)
- 250 grams Colby Monterey Jack cheese, shredded
Garlic Butter
- 3 tablespoons unsalted butter, melted
- 2 cloves garlic, finely minced
For the Pan
- Nonstick cooking spray
Instructions
-
Preheat the Oven: Preheat the oven to 175°C (350°F).
-
Prepare Biscuits: Open the biscuit cans and separate into 16 individual biscuits. Cut each biscuit into 4 even pieces using a knife or kitchen scissors.
-
Combine Biscuits and Filling: Combine the biscuit pieces with shredded cheddar, Colby Monterey Jack cheese, and drained diced green chile peppers in a large mixing bowl, tossing gently until evenly distributed.
-
Make Garlic Butter: In a small bowl, mix melted unsalted butter with minced garlic. Drizzle over biscuit and cheese mixture, then toss to coat evenly.
-
Assemble in Pan: Spray a 23 x 33 cm (9 x 13 inch) baking dish with nonstick spray. Spread the prepared biscuit mixture evenly into the dish, making sure to reach the corners.
-
Bake: Place the baking dish on the center rack and bake for 25 to 30 minutes until the biscuits have expanded and the surface is golden brown.
-
Rest and Serve: Take the dish out of the oven and let it rest for 10 minutes before serving to maintain structure and reach the ideal temperature.